“It’s just a little mold, I can spray it with bleach and move on.” We hear this every week. Sometimes it is true. Often it is not. The difference matters because the wrong call turns a $200 weekend project into a $25,000 remediation and a household full of people who have been breathing spores for six months.
Here is a clear-headed guide to when mold remediation is a DIY job and when it needs a licensed professional in CT or NY.
What mold actually is, and why it matters
Mold is a microorganism. The visible black, green, or pink patches are spore-producing colonies that have established on an organic food source (drywall paper, wood, carpet padding, dust on concrete) in the presence of moisture above 60% relative humidity. The spores are airborne. The visible patch is only the part you can see; the airborne load is what affects respiratory health.
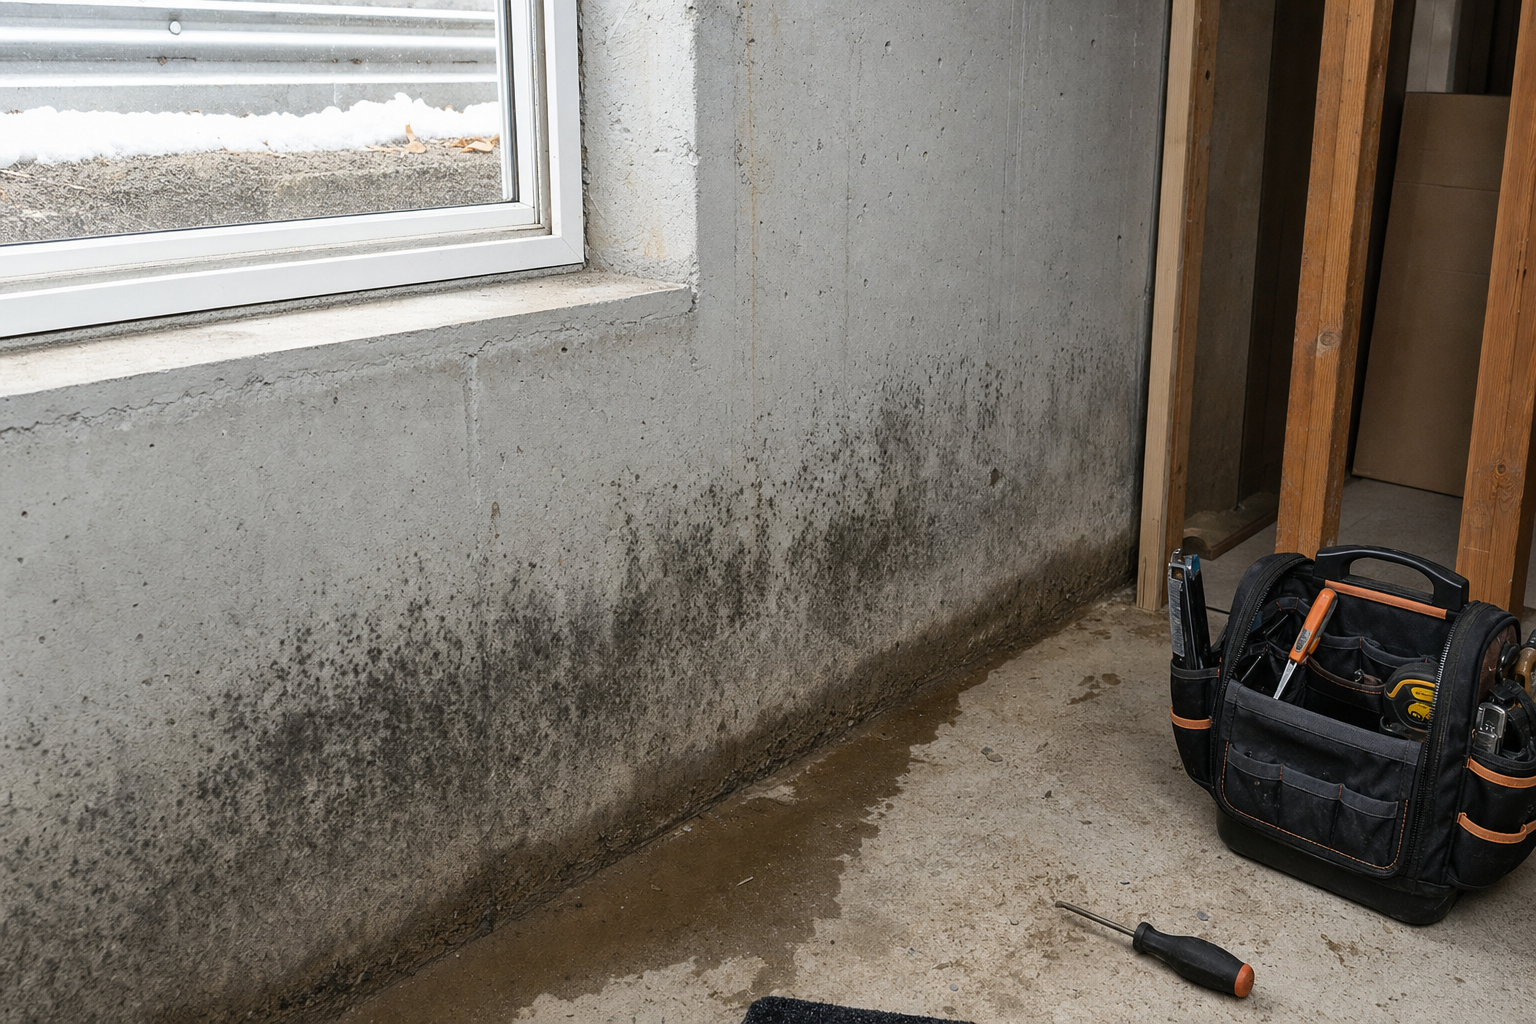
The EPA’s mold remediation guidance and the IICRC S520 standard (the industry reference for professional remediation) both use a 10-square-foot threshold as the decision point between homeowner cleanup and professional work. Below 10 sq ft of contiguous growth, on non-porous surfaces, in a non-sensitive household, DIY is usually appropriate. Above 10 sq ft, or on porous materials, or in a household with respiratory-vulnerable occupants, professional remediation is the right call.
When DIY is appropriate
- Visible growth under 10 sq ft (a 3×3 ft patch or smaller).
- Growth on non-porous surfaces (glass, glazed tile, metal, sealed concrete, plastic).
- No history of household respiratory issues (asthma, COPD, allergies).
- No infants, elderly, or immunocompromised occupants.
- The moisture source has been identified and resolved.
- The mold is not on a wall shared with HVAC ductwork or active air movement.
DIY procedure (EPA-style)
- Ventilate the work area. Open windows; close interior doors to other parts of the house.
- Wear an N95 respirator, gloves (not the thin kitchen kind), and goggles. Skip the bandana.
- Scrub the affected surface with detergent and water. Plain dish soap is fine. Bleach is not necessary and is not recommended by EPA for routine mold cleanup.
- Rinse with clean water. Dry the surface completely.
- Run a dehumidifier or fan for 48 hours to ensure thorough drying.
- Address the moisture source so it does not recur.
If after 7 to 10 days the patch is returning, the moisture source has not been controlled. Stop and address the moisture before further cleanup attempts.
When professional remediation is required
- Visible growth more than 10 sq ft of contiguous area, or multiple patches that add up to more than 10 sq ft.
- Growth on porous materials (drywall, carpet, insulation, wood that is part of the structure).
- HVAC system contamination (mold visible inside ductwork, evaporator coil, plenum).
- Sewage-related contamination (Category 3 water under IICRC S500).
- Hidden growth discovered behind walls or under flooring during demolition.
- Any occupant with asthma, allergic respiratory disease, immunosuppression, or chronic respiratory infection.
- Any infant or elderly occupant.
- Real-estate transaction context where documented remediation is needed for closing.
Why CT and NY basements are particularly prone to mold
Three factors stack up in CT and NY basements:
- High summer humidity. Outside dew points routinely exceed 65°F from late June through early September. Unconditioned basements pull this moisture-loaded air in and condense it on cool foundation walls.
- Older housing stock with stone or block foundations. Hartford, Yonkers, Poughkeepsie, and downtown Norwalk have housing built before perimeter drainage was standard.
- Frost depth around 42″ per CT IRC and NY R301.2. Footings sit deep, walls are exposed to seasonal water table swings, and freeze-thaw cycles open new water paths every winter.
The result is that CT and NY basements run 60% to 80% relative humidity in summer without intervention, which is exactly the band where mold colonies establish on organic surfaces.
What professional mold remediation looks like
Phase 1: Containment and air management
The work area is isolated with 6-mil poly sheeting and zip-wall systems. HEPA-filtered negative air machines create negative pressure inside containment so spores do not migrate to clean parts of the house. HVAC returns and supplies in the work area are sealed.
Phase 2: Removal of contaminated materials
Porous materials with visible growth are bagged and removed. This includes drywall (typically cut 24 inches above the visible growth line), carpet, carpet pad, insulation, contaminated wood paneling, and any cardboard or soft goods. Non-porous structural materials (concrete, framing wood) are scrubbed in place with antimicrobial cleaners and a wire brush or sander.
Phase 3: HEPA vacuuming and surface treatment
Every surface inside containment is HEPA vacuumed twice. Antimicrobial agents (typically EPA-registered fungicides like Mediclean or Concrobium) are applied to remaining surfaces. Encapsulants may be applied to framing where visible staining remains but spore-producing activity has been arrested.
Phase 4: Clearance testing
Third-party air-quality clearance testing verifies the work. The clearance report is what real-estate attorneys, insurance adjusters, and buyer’s lenders accept. The remediator should not be the same party that performs clearance testing.
Phase 5: Reconstruction and moisture-source control
Drywall replacement, painting, and the underlying moisture-source repair (waterproofing, drainage, dehumidification) happen after clearance. Without moisture-source control, mold returns in 6 to 18 months.
Cost ranges for CT and NY mold remediation
- Small remediation (under 25 sq ft, non-porous, single room): $1,500 to $4,500.
- Moderate remediation (25 to 100 sq ft, includes porous material removal): $4,500 to $12,000.
- Whole-basement remediation: $12,000 to $30,000.
- HVAC system remediation: $2,500 to $8,000 in addition to basement work.
- Clearance testing: $400 to $900 per round of sampling.
- Dehumidifier install (whole-basement, hard-piped): $1,800 to $3,200.
- Waterproofing add-on (cause control): $5,500 to $14,000.
Three drivers move you within these ranges: square footage of contiguous growth, porosity of affected materials (drywall and insulation cost more to remove than concrete), and accessibility (finished basements with stored belongings cost more than empty open basements).
Common mistakes homeowners make
- Spraying bleach on porous surfaces. Bleach is mostly water; the water feeds the mold while the bleach evaporates from the surface. EPA explicitly does not recommend bleach for routine mold cleanup on porous materials.
- Painting over moldy drywall. Paint suppresses the visible patch for 4 to 8 weeks. The colony returns through the new paint film, often worse than before.
- Skipping containment. Disturbing a mold patch without containment aerosolizes spores across the rest of the house. Air-quality readings in distant rooms can spike for 48 hours after a careless cleanup.
- Removing porous materials without HEPA. Tearing out drywall without HEPA-filtered exhaust contaminates the rest of the basement.
- Not addressing the moisture source. Remediation without waterproofing is a 6 to 18 month deferral, not a fix.
- Skipping clearance testing on a real-estate-context remediation. Buyer’s attorney will ask for it. Without clearance documentation, the work has no transaction value.
Materials and equipment used in professional remediation
- 6-mil polyethylene sheeting for containment.
- HEPA-filtered negative air machines (typically 500 to 2,000 CFM).
- HEPA vacuums (true HEPA, not “HEPA-style” filters).
- EPA-registered antimicrobials such as Mediclean Germicidal Cleaner, Concrobium Mold Control, or Microban.
- Encapsulants like Foster 40-20 or AfterShock for sealing residual stain on framing.
- 20-mil reinforced vapor barrier for slab encapsulation if the source is below-slab vapor.
- Aprilaire 1850F or SantaFe Advance100 whole-basement dehumidifiers for ongoing control.
Timeline of a typical professional remediation
- Day 1: Free inspection, moisture mapping, written scope and estimate.
- Day 2 to 5: Containment setup, negative air staging, contents protection.
- Day 5 to 10: Removal of contaminated porous materials.
- Day 10 to 12: HEPA cleaning, antimicrobial treatment, encapsulation.
- Day 13: Clearance testing by third-party industrial hygienist.
- Day 14 to 16: Reconstruction (drywall, paint, flooring).
- Concurrent or follow-on: Waterproofing and dehumidification install to prevent recurrence.
Plan on 2 to 4 weeks total for moderate jobs. Large or complex jobs run 4 to 8 weeks.
Real-estate transaction considerations
- Both CT and NY require disclosure of known mold issues on the seller’s disclosure form.
- Buyer’s home inspector may flag any visible suspect growth, triggering air-quality testing during the contingency window.
- FHA and VA loans typically require documented professional remediation before close when growth is confirmed.
- Conventional loan underwriters increasingly require remediation documentation for visible mold patches over 10 sq ft.
- Clearance test documents and warranty paperwork transfer to the buyer at close.
Frequently asked questions
Is black mold always dangerous?
“Black mold” is a colloquial term, not a species name. The species most associated with the term, Stachybotrys chartarum, can produce mycotoxins. Many other species look similar. Color is not a reliable severity indicator; species identification requires lab analysis.
Will my homeowner’s insurance cover mold remediation?
Sometimes, when the cause is a covered peril like a sudden plumbing failure. Long-term seepage, condensation, and gradual moisture issues are typically excluded. Read your policy or call your agent before assuming coverage.
Can I do air-quality testing myself?
You can buy DIY mold test kits, but their results are not accepted by real-estate attorneys, lenders, or insurance adjusters. Third-party industrial hygienist testing is the documentation that holds up.
How do I know if my basement has hidden mold?
Indicators include musty odor that survives ventilation, allergy symptoms that improve when occupants leave the house, visible water staining, and elevated humidity readings (70%+ for sustained periods). A moisture survey can identify hidden water without opening walls.
What is the warranty on professional mold remediation?
Typically 1 to 5 years on the remediated area, conditional on resolving the underlying moisture source. Some contractors offer lifetime warranties when the remediation is paired with their waterproofing and dehumidification systems.
Where to go next
Related reading: when summer humidity becomes the problem, crawl space encapsulation, interior versus exterior waterproofing, and our mold remediation service overview.
If you have visible growth, persistent musty odor, or a buyer’s inspector who flagged mold, we run free inspections across CT and the Hudson Valley. Written estimate within 24 hours.
Book your free inspection
No obligation. Written estimate within 24 hours.
Tell us what is happening with your basement and we will email a written estimate within 24 hours. No cost, no obligation, no high-pressure follow-up.
Get my free estimate